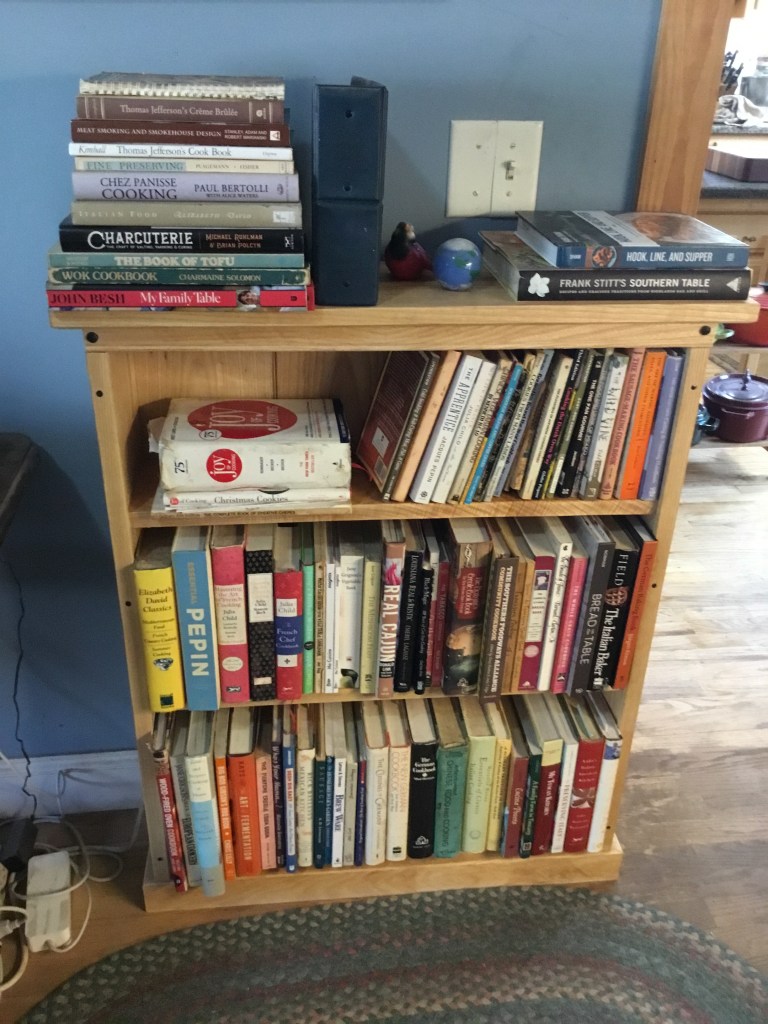
Melanie Jane has been permanently rusticated by her corporate masters, and needed a well organized home office. For two years she has been working under a pair of bookshelves that were completed loaded with cookbooks, including one pile that was headed for the ceiling–and we have ceilings ten feet high.
The solution was to take a trip to my local lumber mill, Rustic Lodge Works, and check on their inventory. To my surprise, they had a large stock of local Ash lumber, and at a reasonable price. This kiln-dried lumber was just the ticket.
I designed this case to be cookbook sized, with the largest books on the bottom, and increasingly smaller books as the shelves rise. The top is designated for odd sized books and specialty books. It was built to fit into a limited space–not too wide, not too high.
Construction is typical bookcase–shelves in dadoes (grooves cut into the wood), hidden by some homemade trim. There’s no glue in the case proper, as it is held together by some fancy French made nails. They are functional and decorative at the same time, like the nails in Craftsman furniture.
The back is solid ash as well, though it is made of beaded tongue and groove. Altogether, this bookcase is full of heaviosity, and should be around for as long as someone likes to cook.
I stumbled across this design after buying a used copy of Early American Wooden Ware for $1 from an Amazon seller. It was first published in 1942, but I have the revised edition done twenty years later. This well illustrated book was written by Mary Earle Gould.
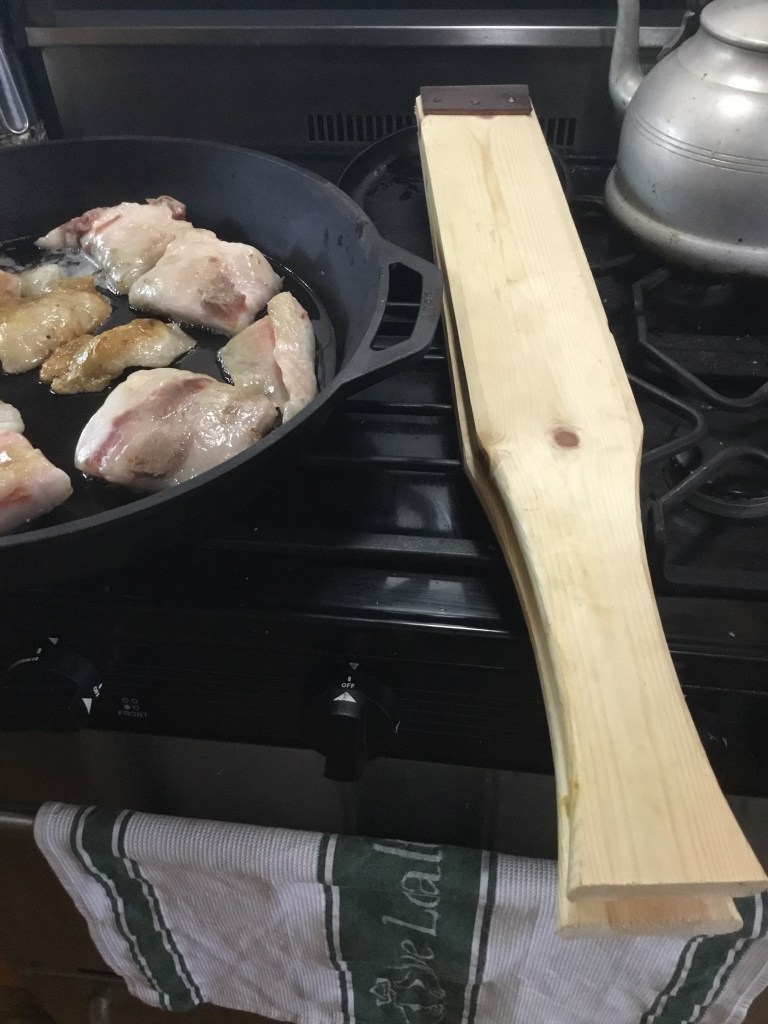
The squeezer was an industrial design from the time when lard rendering was a standard farm household affair. The hinge at the top is a scrap piece of leather, nailed to the two boards. The process is simple enough–heat the pork fat on low heat, and squeeze the fat out with the gizmo. It works inpressively well.
According to the French, there are five varieties of pork fat. Those include leaf lard, back fat, bacon fat, caul fat, and scraps. The finest is leaf lard, internal fat from near the kidneys. Two and a half pounds of local leaf lard yeilded three pints of lard.
I really used primarily one tool making these–a spokeshave. It is a quick and easy project, which will make you free from buying disgusting supermarket lard ever again.
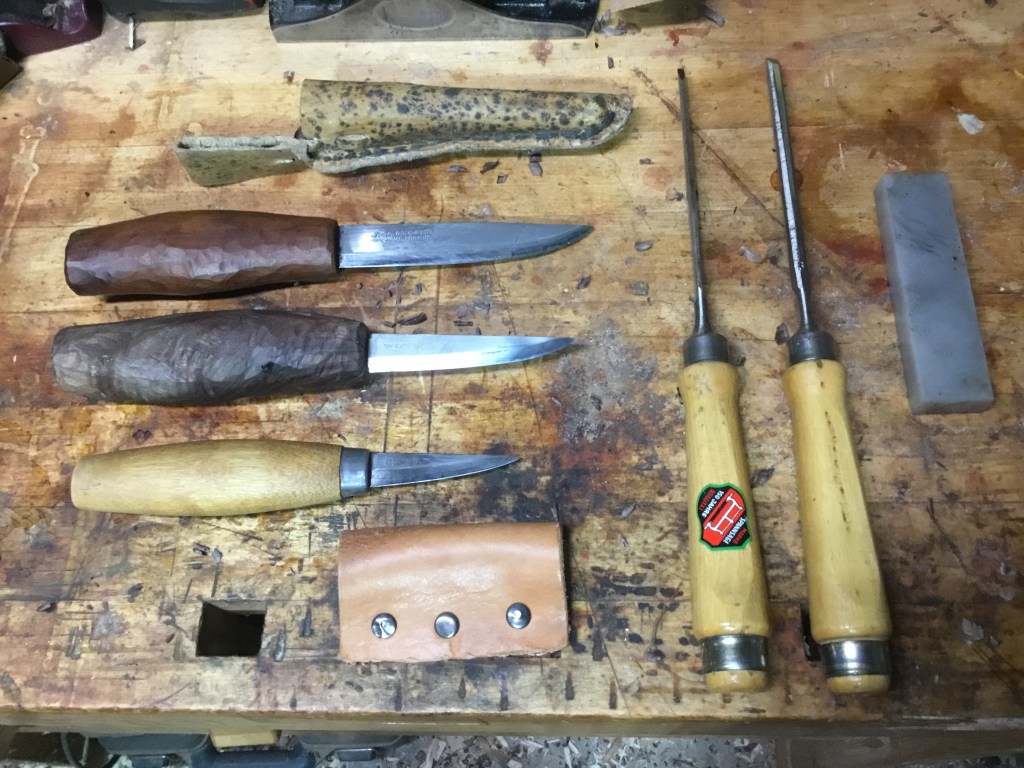
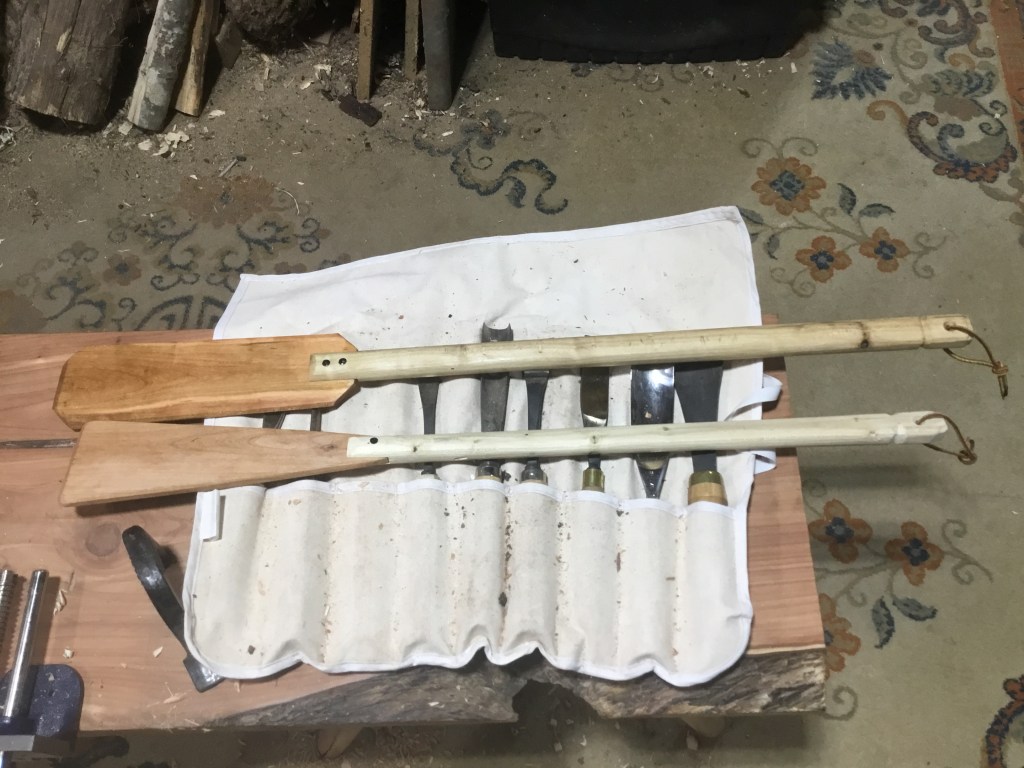
When people involved in Sloyd (crafts) work hear the name of the central Swedish town of Mora, they immediately think of knives. Though Mora knives are made for just about every purpose knives can be used for, from Culinary to Military, they are best known for their woodcarving knives. The use of laminated steel blades in wood carving knives has been at the top of the Mora innovations.
Pictured above are three different generations of Mora knives, and from two different categories. From top to bottom they are as follows: the top knife is an older Mora utility knife, roughly of the length of the current No. 2 knife; the middle knife is the No. 106 carving knife; and the bottom one is the No. 120 carving knife. The differences are as follows.
The #2 knife is a dual purpose craft/utility knife that has a 4 1/4″ long blade. This older model, which I am guessing is 15+ years old, has a laminated blade with a very hard (harder than stainless) carbon steel middle layer. Such a hardened metal by itself would be exceedingly brittle and prone to breaking, hence the two softer and more flexible outside layers. I made the Black Cherry handle–more about that later. Newer versions of the #2 do not have the laminated blade.
The #106 carving knife is brand new, and a perfect length 3 1/4″ carving specialist. The homemade handle is a piece of Black Walnut crotch, with contrary grain that should be just about indestructible. The new brand name the blank is sold under is Morakniv, following the merger of the two leading knife making companies of the town.
The small #120 detail knife has a blade 2 1/4″ long. This version has the standard factory made Birch handle, a signature of Mora knives. This knife is somewhere between the vintage of the other two, and has the name Erik Frost-Mora, on the blade. The birch handled knives are sold around the globe.
Other items pictured are some bevel edged chisels and an Arkansas stone. The Arkansas stone is of the translucent grade, with a grit rating of 1200+. This or some similar sharpening device is absolutely vital to keeping a carving quality edge sharp. A good strop also helps.
If you would like to undertake handle making for your carving knives, these two chisels are the ticket. The narrow one is 2mm, and the wider one is 6mm. The 2mm chisel is the primary mortising tool, and the 6mm is a supplement. These are old German made Spannsäge chisels, though said company has been bought out, but the two sizes are still manufactured by Kirschen (“Two Cherries” in English), and are readily available.
Lastly, there are the homemade sheaths. The top one is a traditional design, sewn around a plastic insert, and the last is a rough and ready cover made to keep my fingers safe when the knife is in its tool roll. I should have included my cut resistant gloves as well, but all carvers know about those.
Some actors get a facelift or Botox or embalming fluid to give them that paralyzed face-look that Hollywood likes, but my Smokehouse has been given a shingle lift. It was something of a fiddly operation, but it turned out to be a success. It was actually completely unplanned.
The story is this: Melanie Jane wanted some tongue and grove put on one of the walls in our bedroom, so I went by our new local wood only lumberyard/sawmill to see what they had. It turned out their office was clad with exactly the kind of tongue and groove that I was looking for, and it was only 3/8″ thick. I left with two bundles of 12′ boards, all a little over 6″ wide.
That was a lot of board feet, as it turned out. I had about one fourth of it left over, and my work shop is not big enough to have a bunch of lumber lying around. I finally thought, what is 3/8″ lumber good for? Then it hit me–shingles. There was just enough wood to shingle the front of my smokehouse.
I cut it up in to 16″ long shingles. The part that is left visible is called the “reveal,” and all the rest is overlap. The 4″ long reveal means that there is actually three layers of shingle on each run, which if installed properly, will make a waterproof covering. I planed off the tongues, and cut off the groove edge with a bandsaw.
Many many shingle nails later the wall was ready for some paint. I wanted to do it right, so I bought some pigment called Blue Ridge Hematite, which is a dark red Iron oxide from Virginia (the door is made from Virginia Juniper, aka Red Cedar). I made egg tempera paint with it using the following recipe. This is for a pint:
1 tablespoon Iron Oxide pigment
2/3 pint boiled (cheap) Linseed oil
Mix these thoroughly and leave overnight. The next day add:
1 Egg
1/3 pint Water
Stir, but don’t shake, the paint. Think of it as one of James Bond’s martinis. Theoretically, the building will rot down before this paint fades. Now there’s only three more walls to shingle. I think those can wait.
Having found myself with enough (free)Black Cherry to replace every handle on every tool I own, I began with the neediest–an old Disston backsaw that has spent years in the spare parts bin. The broken Apple handle was/is usable but unsightly, and it was the first candidate for replacement. If I had known how easy the handle was to make, I would have made one years ago.
While the saw rested in a miracle product called Evaporust, I researched how to make a replacement handle with a Google search. The best post I found was the one that advised the simplest approach–just trace a handle that you like on graph paper, and copy it. I traced the remaining piece of the old handle, and went with it.
The handle itself was split from a much larger chunk of Cherry, and then planed to size. I rough cut the shape with a bowsaw I also made from Cherry and Maple. Then I made my first mistake–I cut out the back end of the handle first, and when I went to rough out the inside of the handle, I promptly snapped off the top. It glued back on easily, but the note to self is rough out the middle first, and then the outside.
With that repaired, I moved to final shaping and finishing. I started out with the universally suggested tool, a rasp, but found it both tedious and seriously slow. After an hour of that torture I said screw it, and pulled out my roll of spoon carving tools. That decision saved the proto handle from the firewood pile, and myself from much more work. A good Swedish Sloyd knife can remove wood much faster than a rasp, and is ideal for the curves on the handle.
The fitting of the handle to the saw blade was simple enough–cut a slot for the saw blade, and mortice out for the iron back. The finish here is super blonde shellac. My last criticism is that the connecting section where the saw blade joins the handle should be beefier, but the function of the saw is unaffected. Overall, for a first attempt at saw handle making it is acceptable, and should last through many years of sawing.
Having finally found a decent quality bandsaw (Rikon) that cost less than a car payment, I decided to break it in by making three Gumbo paddles. The handles on all three are Yaupon holly, a Gulf coast species, and the paddle blades are Black cherry. I made two of the bottom ones, for myself and one Brother in law. The large one is for another Brother in law, who cooks ten and twenty gallon batches of gumbo for St John’s Church in Cullman, which was founded by town father Johann Gottfried Cullman. Said Brother in law’s Son in law just happens to work there.
The paddles blades were cut with the bandsaw from the stump of Cherry tree in our front yard. It had been wind blown for about a year, so it didn’t need much drying. The handles as well were band sawn from wind blown Yaupon, and then turned into ovals by planing first with a Jack plane, and finishing with a Block plane. They were left smooth enough that they needed no sanding.
The mortises in the handles were likewise sawed out with the band saw, and then the waste was chiseled out. Final attachment was with a glue joint held into place with French diamond head nails, which serve a double purpose as decoration.
The larger paddle was finished with straight Walnut oil, while mine was finished with a Walnut oil wax finish. I broke mine in on Sunday cooking Beef stew in our fire pit in the Outdoor Kitchen. The paddle is long enough to have kept me away from the heat, and more importantly the smoke, which was whipped up by a ten mile an hour Southwest wind. The final addition was an accessory cord hanger, which in the case was made from some old worn out boot laces. Waste not, want not.
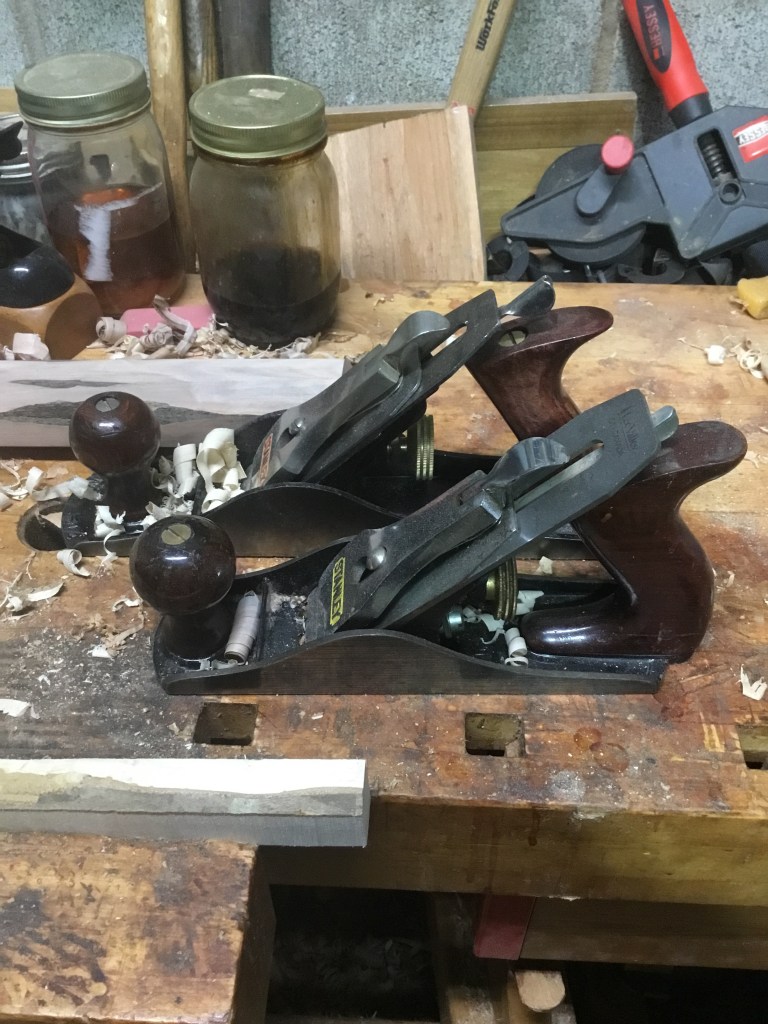
Partner planes are planes of different lengths that have interchangeable parts, from the blades on down. The most common example is the Stanley #4 and #5, both with 2″ wide cutters, which make a versatile duo at 9″ and 15.” Less common is the Stanley #3 and #5 1/4, which makes an attractive alternative to the 4-5 combination.
What we have here is a closer match in the length of the two planes, at 9″ and 11 1/2″ (the #4 and #5 are 9″ and 15″ respectively). The idea for the 11 1/2″ inch length, often referred to as the “Junior Jack,” actually came from the Ohio Tool Company. Logically it makes good sense, as the gap between the standard Smoothing and Jack planes is large at 6.”
With either combination you can do the following. I deep sixed the #3 low quality standard cutter, and replaced it with a Lee Valley 1 3/4″ one–a considerable upgrade (Lee Valley just purchased Hock Tools of California, giving them a huge market share for quality blades.) I took the also not-so-great factory cutter from the #5 1/4, and reground it to an exaggerated camber shape, turning the plane into a long scrub plane. I also have a #5 with a re-ground blade as an extra long scrub plane.
At any rate, I can just switch cutters on these partners and have a really long smoothing plane (or a short Jack plane), and a short scrub plane. The best thing about the #5 1/4, no matter how it is used, is the weight–it’s a full pound lighter than a #5. To me it’s a case of bigger is not necessarily better.
Straight outa Bulgaria comes this excellent Smith forged bearded hatchet. The advantage of this hatchet design is apparent as soon as it’s handled. The space between the head and the handle allows the hacheteer to carve, or cut, like an extension of the hand.
The company that sells these gems is Thracian Forge, which is a top seller on Etsy. They come un-handled, to save shipping and labor, so I had a Sourwood handle ready made waiting for it. Unfortunately, never having seen a Bulgaria/eastern European hatchet before, I made it according to Western style hatchet head dimensions. It turned out to be three inches too long and an inch too wide at the head. A back saw and a little time on the shaving horse solved that problem.
Eastern Europe has become a treasure for traditional woodworkers, as skills lost to industrialization in the West survived in the East and North. Grab a copy of Woodworking in Estonia, which is actually a Ph D dissertation, and look through the Bulgarian and Ukranian forges who sell on Etsy. I tried to identify the smith’s initials on my hatchet, and finally concluded that they are in the eighth century Bulgarian alphabet, which is still in use. For anyone who wants to know, that is the original source of the Russian alphabet. As the people in Ukraine like to point out, Kyiv was already a capital, at the time when Moscow was still a cow pasture.
As an afterthought to making the three Pepper grinders as gifts, I made a Salt grinder for ourselves. This one is also made from green wood, and turned on the foot-powered lathe. A scrap piece was made into a small Christmas ornament.
The reason for purchasing a salt grinding mechanism was simple–it was either that, or pay for shipping on the pepper mills. The price of the grinder was almost exactly the price I needed to reach the free shipping total, and this ceramic grinder looked far better than that used in my previous attempt at making one. The other was such a piece of junk, that I threw it away, and I hardly ever throw away anything.
After turning the two pieces for the body, I let both dry for a couple of weeks before doing anything further. This worked well, as well as better than the Sourwood pepper grinders that I made in less time. The finish, which is Blonde shellac, turned out to be nice and shiny.
I broke this in using it on some fried eggs for our three times a week breakfast muffins. My usual pinches of salt from our salt cellar always results in salt scattered all over the stove, and the cutting board the cellar sits on. This time, no mess to clean up, and super fine ground salt. Another great mechanism for Chef’s Specialties of Pennsylvania.
When Jacques Pépin began work as a chef in France at the age of thirteen, one of his first tasks was to scrape flesh off of the bones of cooked pieces of meat. Said scraps were then made into rillettes, pates, terrines, and other meat paste delicacies. Then the bones were used for stock. Waste not, want not.
The same sense of economy makes me a huge fan of scrapers. Sandpaper is expensive, and a disposable product as well. The fact that sander dust is a carcinogen doesn’t help the comparison. A scraper which is the cost of a few packs of sandpaper can do literally thousands of scrapping jobs.
Here are three models of scrapers. The big green machine on the lower left is a Kunz #12, a near exact copy of the old Stanley #12. This German made edition is ideal for larger jobs, like the Walnut table top I am currently refinishing. The list price is a hefty $169, but I found this one on flea bay for $25. Being a miser has its advantages. The design is circa 1870, which was the heyday of hand tool design.
Directly above that is the classic Stanley #80 cabinet scraper. This flea market purchase was only a couple of bucks, and these things literally never wear out. The #80 has a more sensitive adjustment mechanism the the #12, and is capable of doing very fine work.
The most versatile of scrapers is the Stanley #82 on the right, which can use any size or shape scraper blade. The current blade in use is the classic Bahco (Sandvick) Swedish card scraper. The #82 will prove very handy when I start my upcoming chair seat carving projects.
When primitive man scraped meat off of animal bones, did they make terrines out of it? Doubtful. However, they certainly used scrapers as one of the earliest tools. They were also barely scraping by.